A Tour of Dud #
The goal of this page is to walk through the core capabilities of Dud. After creating a Dud project, we’ll store and version a large archive file. Then we’ll create a reproducible data pipeline to extract files from the archive. Finally, we’ll push our data and code to remote locations to share our work with others. If you want to follow along, install Dud before getting started. If you want to complete the last section of this walkthrough, be sure to install rclone as well.
Creating a Dud project #
First, let’s create a new Dud project:
$ mkdir ~/cifar && cd ~/cifar

$ dud init
Dud project initialized.
See .dud/config.yaml and .dud/rclone.conf to customize the project.
As Dud tells us, dud init creates a .dud directory and some config files. Dud is designed to be ready to use out of the box, so don’t worry about these files for now; we’ll revisit them towards the end of this walkthrough.
Next, let’s download the CIFAR-10 computer vision dataset.
$ curl -sSO 'https://www.cs.toronto.edu/~kriz/cifar-10-python.tar.gz'

$ du -h cifar-10-python.tar.gz
163M	cifar-10-python.tar.gz
Storing and versioning large files #
Now we have a tarball of the dataset. This file is fairly large, so it’s not a good idea to store it in Git. Dud, however, is purpose-built for large files. (In fact, this file is quite small for Dud; it can comfortably handle files in the hundreds of Gigabytes.)
To have Dud store and version this file, we need to create a stage. In Dud, a stage is basically a record of one or more files (or directories) that Dud should track. Stages are written in YAML, and Dud provides a command-line interface to help you with the stage syntax. Here’s the command to create the stage file for our dataset tarball:
$ dud stage gen -o cifar-10-python.tar.gz | tee cifar.yaml
working-dir: .
outputs:
  cifar-10-python.tar.gz: {}
dud stage gen -o cifar-10-python.tar.gz tells Dud: “Generate the stage YAML to track the file cifar-10-python.tar.gz, and print the YAML to standard output.” Because dud stage gen prints to stdout, in true UNIX fashion we can redirect its output anywhere we like. In this example, I use tee to copy the YAML to cifar.yaml while keeping stdout intact. This is just so we can quickly see the contents of the file in this walkthrough. I could’ve just as easily used > cifar.yaml.
Now we have a stage file, but we need to register it with Dud. We do that with dud stage add:
$ dud stage add cifar.yaml
Added cifar.yaml to the index.
dud stage add adds a stage to Dud’s index. The index is a simple text file (located at .dud/index) that tells Dud where all the stages are defined in the project. Don’t worry too much about the index for now. It’s enough to know that the index makes commands like dud status find and load our stage files:
$ dud status
cifar.yaml                stage definition not checksummed
  cifar-10-python.tar.gz  not committed
dud status gives us an overview of the Dud project. Here we can see our new stage, cifar.yaml, and the file it tracks, cifar-10-python.tar.gz. Dud tells us that the tarball is “uncommitted.” This means Dud isn’t storing this version of the file yet. Let’s fix that by committing the stage:
$ dud commit
committing stage cifar.yaml
  cifar-10-python.tar.gz  162.60 MiB / 162.60 MiB  100%  ?/s  65ms total
dud commit goes through all of our stages (in this case, just cifar.yaml) and copies their files/directories to the Dud cache. The cache is a directory that holds all versions of all files and directories owned by Dud. By default, the cache lives at .dud/cache/, but it’s location is configurable (see .dud/config.yaml).
To get a better sense of what dud commit did, let’s look at the directory structure of the project:
$ tree -an
.
├── .dud
│   ├── .gitignore
│   ├── cache
│   │   └── fe
│   │       └── 3d11c475ae0f6fec91f3cf42f9c69e87dc32ec6b44a83f8b22544666e25eea
│   ├── config.yaml
│   ├── index
│   └── rclone.conf
├── cifar-10-python.tar.gz -> .dud/cache/fe/3d11c475ae0f6fec91f3cf42f9c69e87dc32ec6b44a83f8b22544666e25eea
└── cifar.yaml

3 directories, 7 files
Our tarball has been replaced with a link to a file in Dud’s cache. That cached file is our original tarball, but it’s named after the checksum of its contents. This is called content-addressed storage, and it allows Dud to track any number of files (and any number of versions of files) with reasonable assurances against conflicts or duplication.
But how do we make sure we don’t corrupt the cached version of the tarball? What happens if we accidentally modify our dataset?
$ echo 'accidental overwrite' > cifar-10-python.tar.gz
/usr/bin/sh: 1: cannot create cifar-10-python.tar.gz: Permission denied
Dud makes it difficult to accidentally modify committed files. When Dud commits a file, it makes the link to the cache read-only.
The tarball isn’t the only thing that’s changed. Let’s look at our stage file:
$ cat cifar.yaml
checksum: 801b84d7215b34f14d04db1750edf0ede4686b606b8028bdda63f681bf62d324
working-dir: .
outputs:
  cifar-10-python.tar.gz:
    checksum: fe3d11c475ae0f6fec91f3cf42f9c69e87dc32ec6b44a83f8b22544666e25eea
Dud recorded the tarball’s checksum in the stage file. (It also checksummed the stage file itself; more on that later.) With a copy of this stage file and the Dud cache, we can easily get this specific version of the tarball back. Let’s see how that works by deleting the link to the tarball and asking Dud to checkout our stage:
$ rm cifar-10-python.tar.gz

$ readlink -v cifar-10-python.tar.gz
readlink: cifar-10-python.tar.gz: No such file or directory

$ dud checkout
checking out stage cifar.yaml
  cifar-10-python.tar.gz  1 / 1  100%  ?/s  0s total

$ readlink -v cifar-10-python.tar.gz
.dud/cache/fe/3d11c475ae0f6fec91f3cf42f9c69e87dc32ec6b44a83f8b22544666e25eea
dud checkout goes through all of our stages, finds their checksummed files in the cache, and makes the appropriate links in our workspace.
Before we move on, let’s check dud status again:
$ dud status
cifar.yaml                stage definition up-to-date
  cifar-10-python.tar.gz  up-to-date (link)
Dud tells us that cifar-10-python.tar.gz is committed and up-to-date, and it’s available in our working directory as a read-only link to the cache.
We also see that cifar.yaml has its “stage definition up-to-date.” Don’t worry about this for this walkthrough. But if you’re curious, this is what the top-level checksum in cifar.yaml buys us: Dud can detect when we’ve changed the stage (for example, added another file to track) to better inform its actions.
Creating a data pipeline #
Okay, let’s extract the tarball already! We do that with tar, but it turns out tar is hard to use. We could write a quick shell script so we don’t have to remember the tar flags, but we can do one better with Dud.
Now we’ll glimpse the full power of Dud stages. As we’ve seen already, Dud stages own files, but they can also own the command that generates those files. On top of that, stages can depend on other stages. Let’s see this in action by creating a stage to extract the CIFAR-10 tarball:
$ mkdir cifar-10-batches-py

$ dud stage gen \
    -i cifar-10-python.tar.gz \
    -o cifar-10-batches-py/ \
    -- tar -xvf cifar-10-python.tar.gz \
    | tee extract_cifar.yaml
command: tar -xvf cifar-10-python.tar.gz
working-dir: .
inputs:
  cifar-10-python.tar.gz: {}
outputs:
  cifar-10-batches-py:
    is-dir: true
There’s only two lines in this dud stage gen command that are new to us. -i cifar-10-python.tar.gz declares the tarball as an input to this stage. If the tarball changes (for example, if new images are added), Dud will know this stage should be re-run. The -- tells Dud to stop looking for command-line flags (like -i and -o) and to treat the rest of the arguments as a shell command. In this case, our command is the tar command to extract the contents of the archive.
In the YAML output, notice that Dud can own entire directories, not just files. dud stage gen knew to add is-dir: true because we created the directory ahead of time.
Let’s add the stage and check our status:
$ dud stage add extract_cifar.yaml
Added extract_cifar.yaml to the index.

$ dud status
cifar.yaml                stage definition up-to-date
  cifar-10-python.tar.gz  up-to-date (link)

extract_cifar.yaml     stage definition not checksummed
  cifar-10-batches-py  empty directory
This looks as expected. Our tarball is committed, but we haven’t extracted it yet. We do that using dud run:
$ dud run
nothing to do for stage cifar.yaml

running stage extract_cifar.yaml
cifar-10-batches-py/
cifar-10-batches-py/data_batch_4
cifar-10-batches-py/readme.html
cifar-10-batches-py/test_batch
cifar-10-batches-py/data_batch_3
cifar-10-batches-py/batches.meta
cifar-10-batches-py/data_batch_2
cifar-10-batches-py/data_batch_5
cifar-10-batches-py/data_batch_1
As we can see, dud run was considering more than just our new stage. It notes that there is “nothing to do for stage cifar.yaml”. This makes sense because we didn’t define a command in that stage. Then, Dud begins running extract_cifar.yaml, and it sends all of tar’s output to the terminal.
Now we can check that the tar command worked:
$ ls cifar-10-batches-py/
batches.meta  data_batch_2  data_batch_4  readme.html
data_batch_1  data_batch_3  data_batch_5  test_batch
Congrats on defusing the bomb! Now that we know our pipeline worked, let’s commit everything:
$ dud commit
committing stage cifar.yaml
  cifar-10-python.tar.gz  up-to-date; skipping commit

committing stage extract_cifar.yaml
  cifar-10-batches-py   177.59 MiB / 177.59 MiB  100%  ?/s  30ms total
Notice that Dud detected that the tarball from cifar.yaml hasn’t changed, so it knew not to waste time committing it again.
Let’s take another look at our project status for good measure:
$ dud status
cifar.yaml                stage definition up-to-date
  cifar-10-python.tar.gz  up-to-date (link)

extract_cifar.yaml     stage definition up-to-date
  cifar-10-batches-py  x8 up-to-date (link)
Looks good! Note that because cifar-10-batches-py is a directory, dud status reports the status of the contained files. Here, Dud is telling us that the cifar-10-batches-py directory has eight files, and they are all up-to-date and linked to the Dud cache.
Because everything is up-to-date, I bet you can guess what happens if we try re-running our pipeline:
$ dud run
nothing to do for stage cifar.yaml

nothing to do for stage extract_cifar.yaml
Because both of our stages are committed and up-to-date, Dud detects that there’s no sense in re-extracting the tarball. Excellent!
Let’s finish up by visualizing our data pipeline. Dud can output its pipelines in DOT format to be visualized with Graphviz. If we have Graphviz installed, we can pipe dud graph directly into dot to generate an image of the pipeline:
$ dud graph | dot -Tpng -o pipeline.png
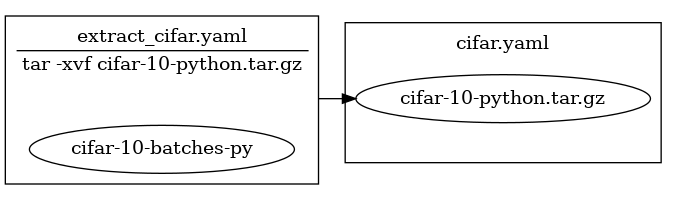
Dud shows our two stages as boxes with the files/directories they own as encapsulated ellipses. The arrow between stages shows that the extract_cifar.yaml stage depends on the tarball file owned by the cifar.yaml stage.
Sharing our work #
Now that we have the humble beginnings of our data pipeline working, it’s a good time to upload our work to a shared location so other people can access and/or collaborate on our code and data. Currently our “code” is our data pipeline definition – the Dud stage files we wrote in the steps above – and miscellaneous configuration files. Our data is the binary files that we’ve committed to Dud’s cache – the CIFAR tarball and its extracted contents. Let’s tackle uploading our data first.
Sharing our data with Dud and Rclone #
Dud uses rclone to synchronize the local Dud cache (.dud/cache) with a remote location. Rclone supports an impressive number of storage systems/providers, but for this demo we’ll use a “fake” remote cache – another local directory on our computer. However, the following steps apply to any “real” remote. (If you’re following along and haven’t installed rclone yet, now’s the time. Check the rclone website for instructions.)
Recall that when we ran dud init, Dud told us that it created two config files: .dud/config.yaml and .dud/rclone.conf. Let’s peek at these files now, starting with .dud/rclone.conf:
$ cat .dud/rclone.conf
# rclone config file
# Run 'rclone --config .dud/rclone.conf config' to setup a remote Dud cache,
# and then set the 'remote' value in .dud/config.yaml to a valid rclone remote
# path.
# See: https://rclone.org/docs/#syntax-of-remote-paths
.dud/rclone.conf is an rclone configuration file dedicated to the project. In it, we will tell rclone where to send and receive our data files. It’s currently empty, but Dud gives us pointers on how to proceed with setting up a remote cache.
rclone config starts an interactive command-line interface to configure a remote location step-by-step, and the --config .dud/rclone.conf flag tells rclone where to store the resulting configuration. Most of the time, you’ll want to use this command to configure a remote with rclone. In our case, we’ll cut to the chase. Add the following two lines to the config file:
# .dud/rclone.conf
[fake_remote]
type = local
This config file will tell rclone that we have a remote location called fake_remote that’s actually just the local filesystem. Again, in a real scenario you’ll want to follow the rclone config command to configure a true remote cache that collaborators can access. The important outcome is that we can now tell Dud the name of the rclone remote we created (fake_remote) and it will coordinate with rclone to handle the rest – regardless of the location and underlying implementation of the “remote” itself.
To tell Dud about our new “remote”, we’ll edit Dud’s configuration file, .dud/config.yaml. Before we do that, let’s examine the file:
$ cat .dud/config.yaml
# Dud project-level config file

# This config file overrides any user configuration from
# "$XDG_CONFIG_HOME/dud/config.yaml" or "~/.config/dud/config.yaml".

# This is the default cache location. Uncomment here or add to your user-level
# config to override.
# cache: .dud/cache

# To enable push and fetch, set 'remote' to a valid rclone remote path. For
# example, if you have a remote called "s3" in your .dud/rclone.conf, and you
# want your remote cache to live in a bucket called 'dud', you would write:
#
# remote: s3:dud
#
# For more info, see the rclone docs:
# https://rclone.org/docs/#syntax-of-remote-paths
Dud again gives us some pointers on configuring a remote cache: we need to set the remote value to a path format described in the rclone documentation. We can accomplish this any number of ways, but we’ll use the opportunity to explore more of Dud’s CLI. dud config allows programmatic access to Dud’s config file. Let’s use it to set our remote:
$ dud config set remote fake_remote:/tmp/dud/cache
This command sets the remote key in the Dud config to the value fake_remote:/tmp/dud/cache. This value tells Dud and rclone that we’re communicating with the remote named fake_remote, and the base directory of our remote cache will be /tmp/dud/cache. (As mentioned in the rclone documentation, including a leading forward slash in the remote path is not recommended in most cases. It’s required here because the remote is an absolute path on our local filesystem.)
We’re now ready to push our data to the remote cache! We do this with one simple command:
$ dud push
pushing stage cifar.yaml
Gathering files      1
Transferred:   	  162.600 MiB / 162.600 MiB, 100%, 0 B/s, ETA -
Transferred:            1 / 1, 100%
Elapsed time:         0.3s
Fixing permissions   1 / 1

pushing stage extract_cifar.yaml
Gathering files      9
Transferred:   	  177.589 MiB / 177.589 MiB, 100%, 0 B/s, ETA -
Transferred:            9 / 9, 100%
Elapsed time:         0.2s
Fixing permissions   9 / 9
dud push goes through all of our stages, looks up their committed artifacts (by checksum), and instructs rclone to copy them to the remote cache. We can confirm our artifacts were copied to /tmp/dud/cache using rclone as well, which provides the check command to compare two directories (or indeed remotes):
$ rclone check .dud/cache /tmp/dud/cache
2022/07/18 01:32:43 NOTICE: Config file "/home/user/.config/rclone/rclone.conf" not found - using defaults
2022/07/18 01:32:45 NOTICE: Local file system at /tmp/dud/cache: 0 differences found
2022/07/18 01:32:45 NOTICE: Local file system at /tmp/dud/cache: 10 matching files
Sure enough, rclone reports that .dud/cache and /tmp/dud/cache are identical. If it were “real”, our collaborators with access to fake_remote could now access all of the data we’ve committed so far! Let’s pretend we are one of those collaborators, and we need to fetch the data files from the remote cache. We can do that with the aptly-named fetch command:
$ rm -rf .dud/cache/*    # start with an empty local cache

$ dud fetch
fetching stage cifar.yaml
Transferred:   	  162.600 MiB / 162.600 MiB, 100%, 0 B/s, ETA -
Transferred:            1 / 1, 100%
Elapsed time:         0.3s
Fixing permissions   1 / 1

fetching stage extract_cifar.yaml
Transferred:   	        974 B / 974 B, 100%, 0 B/s, ETA -
Transferred:            1 / 1, 100%
Elapsed time:         0.0s
Fixing permissions   1 / 1
Transferred:   	  177.588 MiB / 177.588 MiB, 100%, 0 B/s, ETA -
Transferred:            8 / 8, 100%
Elapsed time:         0.2s
Fixing permissions   8 / 8

$ rclone check .dud/cache /tmp/dud/cache
2022/07/18 01:32:47 NOTICE: Config file "/home/user/.config/rclone/rclone.conf" not found - using defaults
2022/07/18 01:32:48 NOTICE: Local file system at /tmp/dud/cache: 0 differences found
2022/07/18 01:32:48 NOTICE: Local file system at /tmp/dud/cache: 10 matching files
dud fetch is the inverse of dud push; it looks up artifacts the same way push does (from stage files), but it copies from the remote cache to the local cache.
Versioning our code with Git #
We’ve now stored our data in a shared location and we know how to get it back. Next, we need to do the same with our code. Sharing the code – our stage files and configuration – is critical; without them, our collaborators (and ourselves!) won’t be able to make sense of the data. Furthermore, we want to version our stage files so we can trace the changes in our pipeline over time. Lucky for us, the practice of versioning and sharing source code is a pillar of the digital world, and there are many source control management (SCM) tools at our disposal that are designed for our situation.
We’ll use Git to version and share our code. Git is the most popular SCM tool, but in practice you could use any SCM tool for this project (e.g. Mercurial). If you’re not familiar with Git, don’t worry; we’ll only be running the most basic Git operations in this walkthrough. That said, Dud’s command-line interface (CLI) is intentionally meant to mirror the core Git commands. If you’ve followed along this far, the Git commands below should hopefully look very familiar. (And indeed the inverse is true as well: If you’re familiar with Git but new to Dud, the hope is you’ll feel right at home with Dud’s CLI.)
The steps below gloss over installing and configuring Git. If you are new to Git, please search out any of the countless resources on the Web to learn more.
First things first, let’s create a Git repository for the project:
$ git init
Initialized empty Git repository in /home/user/cifar/.git/
Let’s take a look at our status to decide what to commit:
$ git status
On branch main

No commits yet

Untracked files:
  (use "git add <file>..." to include in what will be committed)
	.dud/
	cifar-10-batches-py/
	cifar-10-python.tar.gz
	cifar.yaml
	extract_cifar.yaml
	pipeline.png

nothing added to commit but untracked files present (use "git add" to track)
We can see that Git is suggesting that we use it to track a bunch of files. We’re already tracking the CIFAR tarball and its contents with Dud, so we don’t want them tracked in Git. (But remember, we do want to track their Dud stage files in Git! See the discussion directly above.) Also, it’s not important to track our picture of the Dud pipeline, pipeline.png. With these things in mind, we’ll write a .gitignore file that tells Git to ignore these files:
# .gitignore
/cifar-10-batches-py
*.tar.*
*.png
$ git status
On branch main

No commits yet

Untracked files:
  (use "git add <file>..." to include in what will be committed)
	.dud/
	.gitignore
	cifar.yaml
	extract_cifar.yaml

nothing added to commit but untracked files present (use "git add" to track)
That’s better. Now, the Git-savvy folks in the audience may be concerned about tracking the entire .dud directory in Git. After all, .dud/cache contains all of our large binary files, and they are not suited for source control. As it turns out, dud init automatically creates its own .gitignore file in the .dud directory to help prevent the painful mistake of committing the Dud cache to source control. (If you use another SCM tool, be careful: You’ll need to manually exclude your Dud cache!)
Let’s tell Git to track everything else:
$ git add .

$ git status
On branch main

No commits yet

Changes to be committed:
  (use "git rm --cached <file>..." to unstage)
	new file:   .dud/.gitignore
	new file:   .dud/config.yaml
	new file:   .dud/index
	new file:   .dud/rclone.conf
	new file:   .gitignore
	new file:   cifar.yaml
	new file:   extract_cifar.yaml
With everything in order, let’s commit our code:
$ git commit -m 'initial commit'
[main (root-commit) ca689da] initial commit
 7 files changed, 25 insertions(+)
 create mode 100644 .dud/.gitignore
 create mode 100644 .dud/config.yaml
 create mode 100644 .dud/index
 create mode 100644 .dud/rclone.conf
 create mode 100644 .gitignore
 create mode 100644 cifar.yaml
 create mode 100644 extract_cifar.yaml
Excellent, our code is committed to our Git repository! The next step would be to create a remote Git repository and push our commit to it. I’ll leave this as an exercise for the reader, but once you’ve done that, this entire project – the data and the code – will be fully published and ready to share with others! You can find good tutorials on how to set up a remote Git repository on any number of Git hosting services, such as GitHub, GitLab, sourcehut, and many more.
Summary #
In this page we walked through the core capabilities of Dud: storing and versioning large files and directories, and creating reproducible data pipelines. We finished by preparing our code and data to be shared with others. If you haven’t already, now’s a good time to install Dud and give it a go yourself! If you want to learn more, check out the CLI Reference or reach out on Github Discussions.